Getting started
This document will explain how to setup an envionment to use RESTBuilder.
If you already have Cohorte installed and a node created, skip ahead to Retrieve RESTBuilder.
Cohorte
RESTBuilder was designed to run on Cohorte. So beforehand, you need to install it.
Once it is installed, create a node. To do so, open a shell and execute the following command :
$ cohorte-create-node -a <app-id> -n <node-name>
Retrieve RESTBuilder
Now that a node is created, we will get the dependencies and RESTBuilder.
The only dependency RESTBuilder has is SQLAlchemy. You need to retrieve the package and place it into the folder “repo” in the node. There are several ways to do this :
With virtualenv and pip (Recomended) :
First, you need to create a virtualenv. You will need to keep this environment so I advise you to place it next to the node folder.
$ virtualenv env
Now that is created, you need to activate it. To do so, execute the following command :
$ source env/bin/activate
(env) $
You should see (env) appear just before the $ in your prompt. It indicates that the virtualenv called ‘env’ is activated. You will need to activate it everytime you want to run the application. To deactivate it, juste use the command “deactivate”.
With the virtualenv activated, you have access to pip. With it, you will download the package SQLAlechemy.
(env) $ pip install sqlalechemy
With this command, you will download sqlalchemy along with all its dependencies. Since it doesn’t have any, the list of the installed packages should be the following :
(env) $ pip list
pip (7.1.0)
setuptools (18.0.1)
SQLAlchemy (1.0.8)
wheel (0.24.0)
With PyPi :
On PiPy, you can download the package sqlalchemy directly. Since it doesn’t have any dependencies, if you place the downloaded package in the folder “repo” of the node, the dependency to SQLAlchemy will be satisfied.
You can download a tar.gz containing the package on this page. The folder to copy into “repo” is the folder lib/sqlalchemy in the archive.
Configure RESTBuilder
Now that you have everything to run the cohorte node, you will need to configure it.
First, open the file <node>/conf/run.js. Here is the configuration you should match :
{
    "node": {
        "shell-port": 0,
        "http-port": 9000,
        "top-composer": true,
        "name": "<node-name>",
        "console": true
    },
    "app-id": "<app-id>",
    "cohorte-version": "1.1.0",
    "transport-http": {
        "http-ipv": 6
    },
    "transport": [
        "http"
    ]
}
The param <app-id> and <node-name> should be the value you gave earlier to the command cohorte-create-node. To match this configuration, the only parameters you should have to changer are “top-composer” and “http-port”.
The value of “http-port” can be any port you wish. It is on that port that the webadmin will be available.
Then, open the file <node>/conf/composition.js. If this file doesn’t exist, create it and place the following in it :
{
    "name": "<app-id>",
    "root": {
        "name": "<composition-name>",
        "components": [
            {
                "name" : "RESTBuilder-database",
                "factory" : "restbuilder.database_factory",
                "isolate": "<isolate-name>"
            }
            ,{
                "name" : "RESTBuilder-records",
                "factory" : "restbuilder.records_factory",
                "isolate": "<isolate-name>"
            }
        ]
    }
}
Now, you will need to create the file <node>/conf/<isolate-name>.js. It will contains customisation settings for the isolate called <isolate-name>.
{
    "composition" : [ {
        "name" : "pelix-http-service",
        "properties" : {
            "pelix.http.port" : 5000
        }
        } ]
}
With these settings, the API will be available on the port 5000 of the computer running this node.
Finally, you will need to setup the database settings. To do this, create the file <node>/conf/restbuilder/database.js. You will need prior to this to create the folder restbuilder. Make sure the name is in lowercase
Todo
make the file database.js
{}
Run the API
Now the only thing left to do is to start the API. To do so, you only need to execute the script run (or run.bat if you are on windows) at the root of the node.
If you used virtualenv and pip to manage REScBuilder’s dependencies, do not forget to activate the environment before executing this script.
(env) $ ./run

   _____ ____  _    _  ____  _____ _______ ______
  / ____/ __ \| |  | |/ __ \|  __ \__   __|  ____|
 | |   | |  | | |__| | |  | | |__) | | |  | |__
 | |   | |  | |  __  | |  | |  _  /  | |  |  __|
 | |___| |__| | |  | | |__| | | \ \  | |  | |____
  \_____\____/|_|  |_|\____/|_|  \_\ |_|  |______|


     APPLICATION ID : RESTBuilder
          NODE NAME : RESTBuilder
         TRANSPORTS : http

       TOP COMPOSER : True

          HTTP PORT : 9000
         SHELL PORT : 0

   COMPOSITION FILE : composition.js
         AUTO START : True


       COHORTE BASE : ~/RESTBuilder
       COHORTE BASE : ~/RESTBuilder
       COHORTE HOME : /opt/isandlatech/cohorte
 PYTHON INTERPRETER : python
           LOG FILE : ~/RESTBuilder


** Pelix Shell prompt **
$
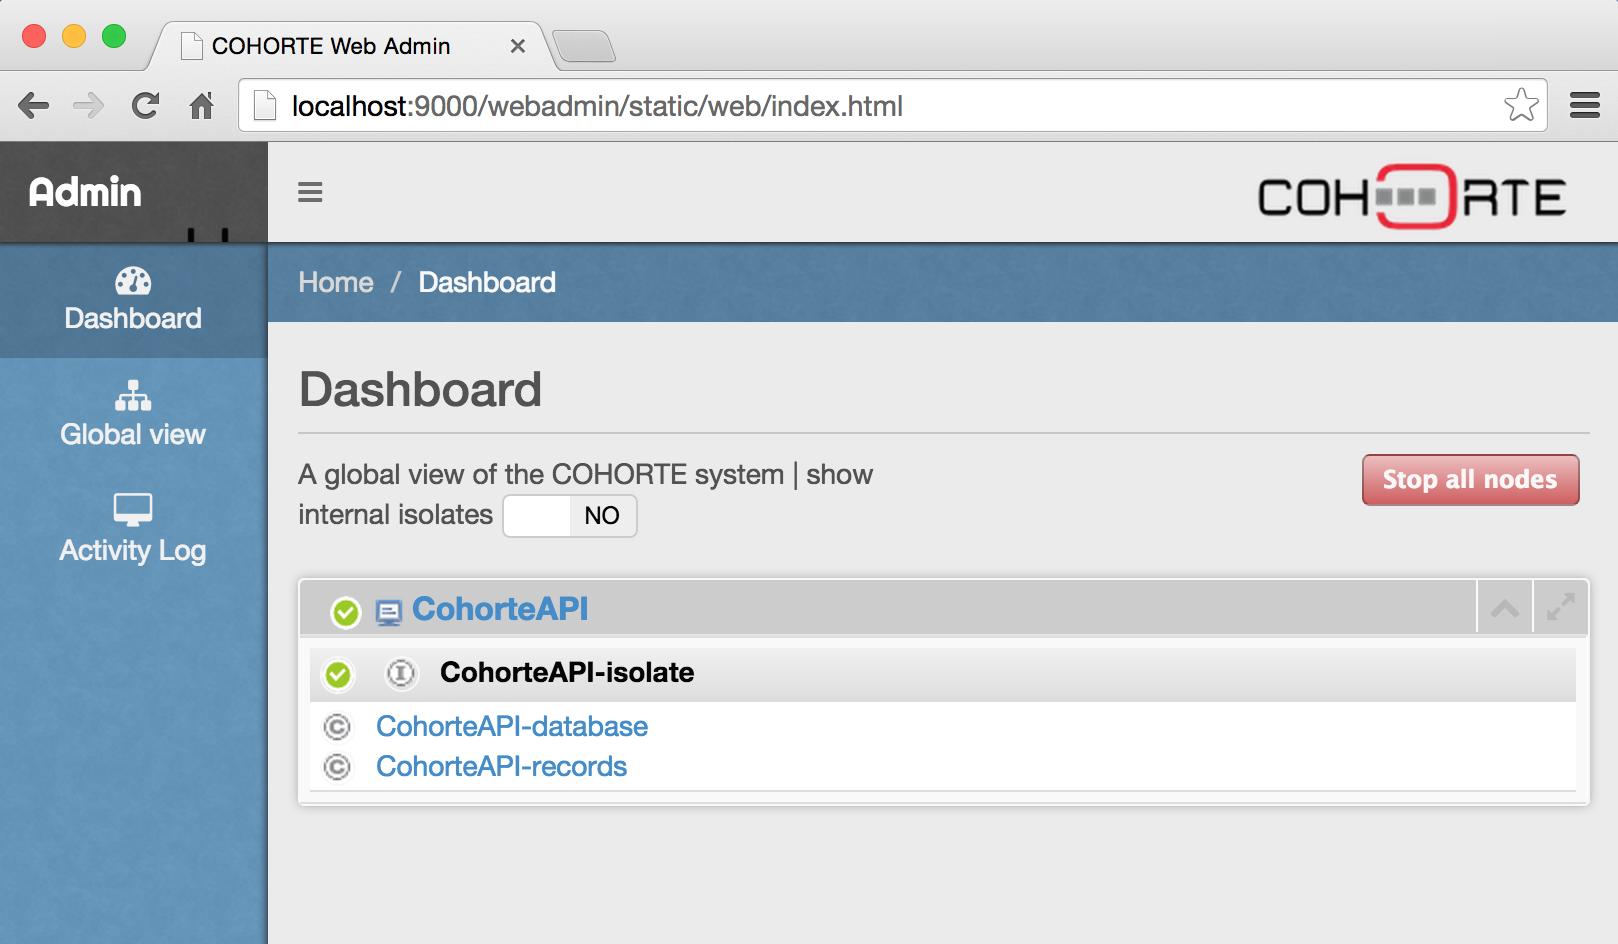
In the webadmin, you should then see the components RESTBuilder-database and RESTBuilder-records in an isolate. The webadmin is accessible on the servlet /webadmin and the port “http-port” you set earlier on the machine running the node.
If this is running correctly, you can now go the next section and start developping your API.